

If you are wondering the best way to stain a wood deck, you are not alone. This is easily one of the most common questions I am asked for which there is no straightforward answer.
When a caller asks how to stain a wood deck, I usually start by describing my favorite deck staining method. I will adjust my recommendation if that method doesn’t fit the circumstances.
Since this is an article, I can take a little more time to understand the various methods.
I am going to limit the focus of this article to the application of Oil-Based wood deck stains and sealers. There are certain caveats to working with water-based formulations. We don’t generally recommend water-based stains for exterior wood. For that reason, I am not going to get into water-based finishes here.
Specifically, I am going to address two types of oil-based finishes: Deep penetrating paraffin oil-based stains like Woodrich Brand Timber-Oil and Alkyd oil-based finishes like Woodrich Brand Hardwood Wiping Stain.
First, let’s examine how each type of finish is designed to work, then move on to application theory.
Timber Oil is designed to penetrate deep into the wood, occupying all the space and leaving no room for moisture intrusion.
Hardwood Wiping Stain is designed to protect by “cross-linking” to form a protective barrier at the surface of the wood. It is important to distinguish that this is not a film that forms on the surface. Film-forming products are prone to flaking and peeling. I would generally not recommend them for use in exterior staining applications.
Let’s think about why we would want to stain a wood deck.
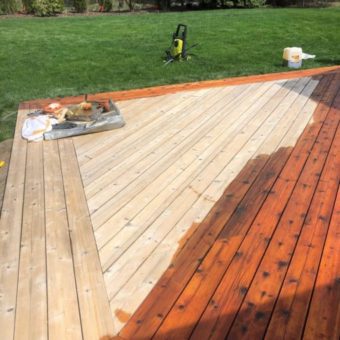
Knowing the “why” of wanting to stain a wood deck makes it easier to understand “what” that goes into completing the job.
Why
Your wood deck is very likely outside. This means it is going to be exposed to the elements.
Wood that is left exposed to the elements is at risk of suffering a number of negative issues. Chief among them are discoloration and rot.
An excess of moisture causes rot, and UV rays from the sun cause discoloration (greying). Thus, our goal is very simple and straightforward.
First, we must keep water out of the wood. Second, we must protect the wood from the sun if we don’t want it to turn grey or silver.
What?
Oil-based stains and sealers do an excellent job of protecting and preserving your wood for years when installed and maintained properly. Choosing the proper type of oil-based stain for your project can seem complicated. The choice can be made much simpler by ignoring all of the benefits of a product and only considering its limitations.
Woodrich Brand Timber-Oil can be applied to any type of wood in virtually any condition however because of the way it works its performance is very limited on dense exotic hardwoods like Cambara, Garapa, Ipe and Teak. We do not recommend Timber-Oil for any exotic hardwoods.
Woodrich Brand Hardwood Wiping Stain performs exceedingly well on dense exotic hardwoods. This stain can also be applied to any other type of exterior wood such as cedar or pressure treated pine. Hardwood Wiping Stain is limited in its performance when it is applied to fresh new cedar or pressure treated lumber. We only recommend Timber-Oil for staining new cedar or pine construction.
So, What is The Best tool to Stain a Wood Deck?
Keeping our goals in mind, we can look at each tool/method and decide which is going to be best suited to your specific deck project. I can tell you from experience most often it’s going to be a method involving a couple tools. I am going to start with a brief description of each tool and probably throw my opinions around a bit too.
Rolling (my eyes)
Using A Roller To Apply Stain
Pros of Using A Roller
Most people are familiar with a paint roller – they roll quickly and do a good job with “coverage”. While I understand why someone might choose a roller to apply stain to a wood deck, I am against it. When it comes to applying deck stain, there is nothing a roller can do that another tool can’t do better/faster.
Cons of Using A Roller
Working quickly with a roller and applying a thin material like a deck stain, you are probably going to make a mess. Rollers tend to “fling” thin material when you roll too quickly. Rollers also do a poor job of carrying thin material.
That means you are going to be doing a lot of dipping and moving with your stain bucket. I am not even going to talk about the nightmare roller trays could cause you. Can deck stain be applied by roller? Yes. It is not something I would recommend.
Using A Brush To Apply Stain
Pros Of Using A Brush
When it comes to control, few tools are going to outperform a good ole’ brush. A brush is invaluable if you need to get into tight places. There is less chance of getting stains on surfaces you don’t want to get stains on.
Cons Of Using A Brush
There are two major drawbacks to brushing stain onto a wood deck.
First, it is slow and tedious. You have to keep an open stain bucket, pail or pot within arm’s reach the whole time. Unless you attach the brush on some type of pole, plan to be crawling around on your knees while staining.
The second drawback to a brush application is that it can easily fool you. A brush does a good job of surface staining the wood. However, it does so without giving the stain enough time to fully soak in and saturate the wood.
Since our goal is to get as much product into the wood as possible, brushing can be a slow process.
Using A Pad Applicator To Apply Stain
Pros Of Using A Pad Applicator
You can stain a wood deck with a pad applicator. It is pretty easy and straightforward. Using a stain pad applicator gives you nearly as much control as you have with a brush. You actually have more control with a pad applicator on a pole than a brush on a pole.
This means you can do the work standing up, which, of course, is nice. A stain pad does a better job of pushing the stain down into the wood than a brush. You can move faster and have less chance of an underapplication of the product.
Cons Of Using A Pad Applicator
The major downside to working with a pad is the open stain bucket or tray you must have close by. Another limitation is that it can be difficult to get into tight places due to the ridged nature of the tool.
Using A Rag To Apply Stain
Pros Of Using A Rag
Applying stain with a ragging method can be quick and efficient. However, it can also be a little messy, so you will definitely need some gloves. There are two basic methods for applying stain with a rag. For handrails and detail work, simply dip a rag into the stain and then dab and wipe it on.
Take care to let the wood soak up as much product as possible. This method offers a lot of control, and it is easy to get into the little nooks and crannies.
I like to call the other ragging method “controlled chaos.” It involves pouring the stain onto the wood and then laying it out with a rag. This method can be very quick, but it’s probably not for the faint-hearted. It must be done quickly. You have to understand how to “read” the wood. Let it tell you how quickly you can move and what areas might need another wipe or excess stain removed.
Using A Sprayer To Apply Stain
“Should I spray when I stain a wood deck?” Plenty of people say no. Maybe you heard that spraying results in inferior protection.
Pros Of Using A Sprayer
Here is a completely different opinion. In a perfect world, I would use a sprayer for every wood staining project I get my hands on. Spraying has many advantages over all of the other tools/methods, with only one tiny disadvantage: the risk of overspray.
Cons Of Using A Sprayer
“Overspray” is described as that terrible moment when a stain from your sprayer lands somewhere it was not supposed to. Some surfaces lend themselves to being easily wiped clean. Porous surfaces like concrete, stone, or mortar suck up the stain and make it very difficult to remove.
There are a number of effective measures you can take to prevent overspray. Because of that, tool/method is always going to be my first choice. Wind and project size are the only circumstances I will consider not using a sprayer to stain a wood deck.
How I Prefer to Stain a Wood Deck
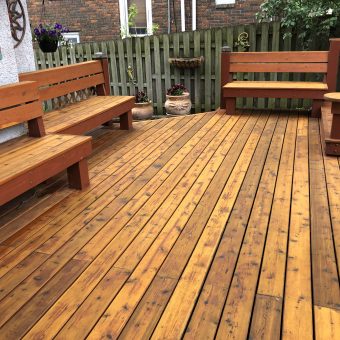
Let’s assume that it is not obnoxiously windy. My preferred method is going to be to transfer the stain onto the wood using a sprayer. I will lay it out using a stain pad applicator on a pole.
I am also going to keep a rag or brush handy for when I get into the tight spots. Did you notice that I didn’t say “spray the stain onto the wood?”
To apply oil-based deck stain, you want to use a High-Volume/Low-Pressure (HVLP) Sprayer.
That may sound fancy or expensive, but it doesn’t have to be. The most common HVLP sprayer is the type you may have used to spray weed killer or insecticide. I am talking about a pump-up garden sprayer, and they work great. Choose one that has a fan spray tip, and you will be all set.
There is no need to pump it up to full pressure. Your goal is simply to transfer the stain from the sprayer and onto the wood. As long as you have enough pressure to maintain the fan pattern you are in good shape.
The Deck Staining Process
I will apply the stain heavily when I am staining the deck boards. The sprayer is used to saturate 3 to 4 courses of boards all the way across the deck. The deck stain should puddle slightly on the surface.
Look for air bubbles to form as the stain soaks in. This is the stain forcing all of the air out of the wood.
After applying stain to that set of boards, go back over them with the stain pad and lay out the stain. The goal is to drive as much product into the wood as possible.
I then transfer any excess stain to the next set of boards I am getting ready to spray. Repeating this process, going back over them with the stain pad allows quick movement across the deck surface.
To reduce the need for masking, I do not spray the first 3 courses of boards nearest the house. Instead, I will just spray a puddle of stain onto the 4th course of boards. Then I suck it up with the stain pad and then transfer it to the boards nearest the house. I repeat this process as necessary until I am satisfied the wood has soaked up as much product as possible.
Handrails or Vertical Surfaces
When I am spraying the handrails or any vertical surface, I make several passes with the sprayer.
First, spray the stain and let it soak in, then spray again until the wood rejects the product. This process lets me know that the wood is saturated.
I will use my rag or a brush to catch drips and cut down on any mess. I will switch to the brush when I get close to the house. Another method is to simply spray some stain into my rag and then use the rag to stain the wood.
Please keep in mind that this was only meant to briefly describe the process. It is not a comprehensive How-To article.
Before I finish, one more application method is definitely worth mentioning. This one is simply not practical for existing construction projects.
Dipping
If you happen to be “pre-construction” and you are doing the early research, you might want to consider dipping.
Dipping is exactly what it sounds like. You build a trough deep enough to submerge your wood pieces in the stain.
First, you fill the trough with stain.
Then, you begin dipping each piece of wood.
The wood is submerged until no more bubbles come out of the wood.
Then you can either rack it and stack it or just give it a quick wipe down and install it.
Dipping can be a little messy, but the time it saves is amazing. Plus, you can apply the stain to all 6 sides of each piece of wood.
Dipping works great for cedar shingles, wood spindles, or pickets, as well as anywhere else you are working with reasonably small pieces. You can certainly build larger troughs and even dip 16’ or 20’ deck boards.